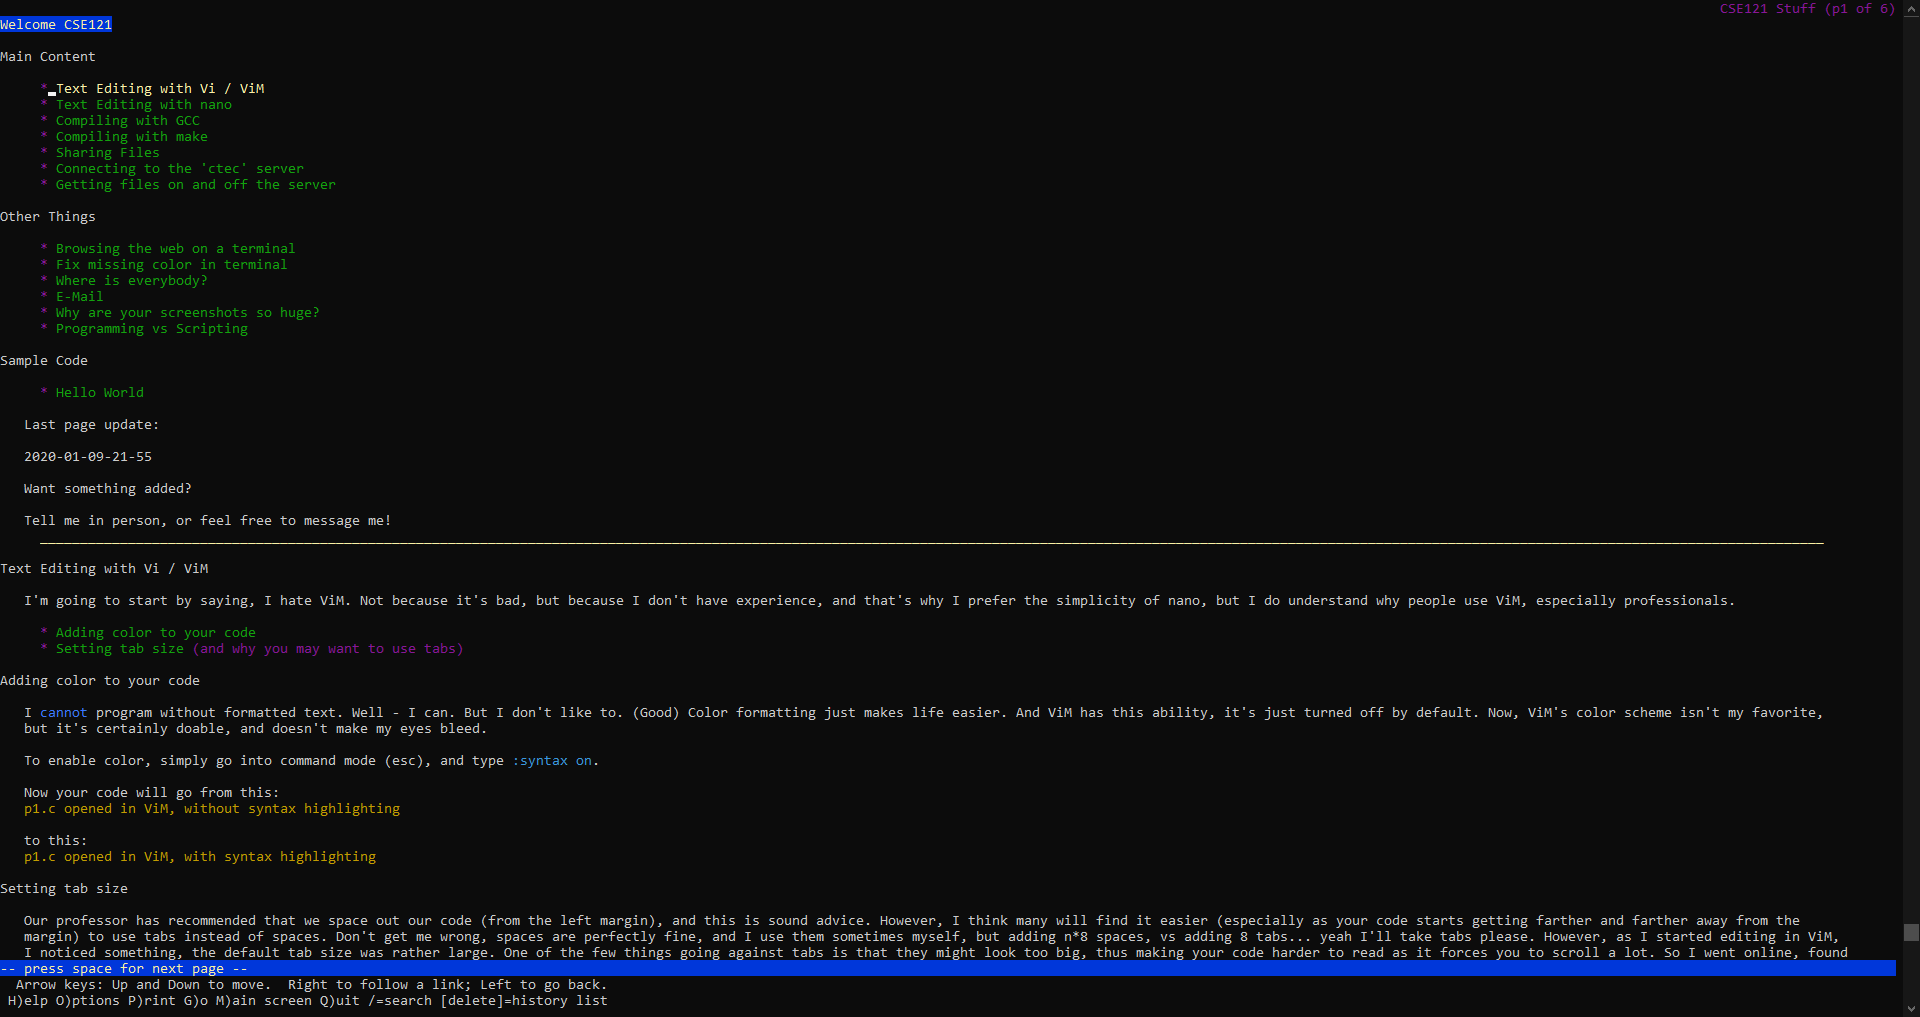
I'm going to start by saying, I hate ViM. Not because it's bad, but because I don't have experience, and that's why I prefer the simplicity of nano, but I do understand why people use ViM, especially professionals.
I cannot program without formatted text. Well - I can. But I don't like to. (Good) Color formatting just makes life easier. And ViM has this ability, it's just turned off by default.
Now, ViM's color scheme isn't my favorite, but it's certainly doable, and doesn't make my eyes bleed.
To enable color, simply go into command mode (esc), and type :syntax on.
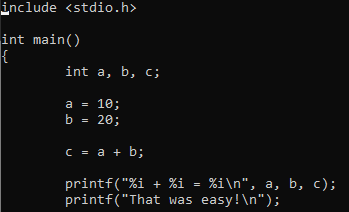
Now your code will go from this:
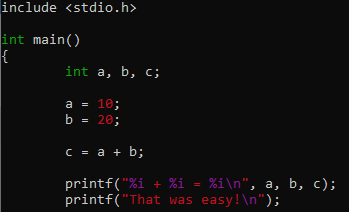
to this:
Setting tab size
Our professor has recommended that we space out our code (from the left margin), and this is sound advice. However, I think many will find it easier (especially as your code starts getting farther and farther away from the margin) to use tabs instead of spaces.
Don't get me wrong, spaces are perfectly fine, and I use them sometimes myself, but adding n*8 spaces, vs adding 8 tabs... yeah I'll take tabs please.
However, as I started editing in ViM, I noticed something, the default tab size was rather large. One of the few things going against tabs is that they might look too big, thus making your code harder to read as it forces you to scroll a lot.
So I went online, found the solution, and am posting it here for everyone's convenience. Once again, use spaces if you want. But if you're like me, and you prefer tabs, I assume you'll want to change the tab size.
ViM appears to default to 8, meaning a tab visually appears the same as 8 spaces. I think most people use a 4-space tab, though I've found myself using 2 from time-to-time.
Either way, here is how you change tab size: first, go into command mode (esc), and then enter this command :set ts=4. Simple as that.
NOTE: This only changes how tabs appear visually in ViM, if you would prefer that tab outputs spaces into instead of a tab, you can do that with set sts=<spaces>. ts and sts stand for tabstop and softtabstop respectively.
Saving your settings
It came to my attention that changing settings like syntax and tab size, don't actually stay changed when you close and re-open ViM. If you're wondering how on earth I didn't notice that, it's because I really do use nano for everything. This entire web page was created in nano (mostly during class).
However I totally understand how annoying it is to change settings every. single. time. you open ViM, and that's why you can create a file called .vimrc. Much like .bashrc and .nanorc this is a file that will reside in your home directory and affects it's namesake, in this case it will affect ViM.
To save your settings, instead of entering them in ViM's command line, ie :syntax on, you can just place each of these commands on a seperate line in the file ~/.vimrc like this: syntax on (leave out the ':').
Even though I sometimes miss information like this, I hope you'll all keep returning in the future for more.
Miscellaneous settings
Here are some extra settings you can try out, credit goes to Joshua Koehler, since I kinda just stole his Canvas post ;)
A random one: set visualbell: Flash the screen instead of beeping on errors.
Color themes
set background=dark is an interesting one, however I think people will have more fun with this:
ViM has various color themes, which you can set using color <theme>, here are the themes available on the clark server:
blue
darkblue
default
delek
desert
elflord
evening
industry
koehler
morning
murphy
pablo
peachpuff
ron
shine
slate
torte
zellner
I definitely recommend trying some of these out, and if you want to cycle through them yourself, just enter command mode, type :color (don't forget the space), and press tab to cycle through them.
Here's a script that will install my recommended theme (atom-dark 256 color version) automatically for you. To install the theme, copy and paste this command (or type it) into the terminal:
If you need to run the script again, assuming you haven't deleted it, just run it (in the directory you downloaded it in) with ./v_ad256.sh, you don't need to run this long command again. If you'd rather see the installer script first before you run it, here it is:
If for whatever reason the 256 color theme doesn't work properly, or at all, then you may be using a terminal that is rather old, however there is a version for a standard 16 color terminal, just replace every instance of atom-dark-256 with atom-dark in the script.
Lines
Line numbering. This will add line numbers to the left margin of the screen, you can enable it with either set number or set nu. You can also change how large this margin is, referred to as the 'gutter', with this set numberwidth=<an_integer>.
I just noticed that ViM has word wrap turned on be default, and that makes me cry, so here's how you fix it: set nowrap now lines won't wrap. If for whatever reason you decided you liked it better before, you can change it back with set wrap.
Text Editing with Nano
What is nano? Well as far as I'm concerned, it's my defacto go-to text editor for linux terminal.
Nano is just a simplistic editor, that has all the features I need, though for some in the industry it's not enough.
However even they would have to agree, that if you just need to make a quick change to a document, nano is great for getting in and out quickly.
Both ViM, and nano are installed on the ctec server, so feel free to use both whenever you see fit.
Before we start, if you want to know why you may want tabs, see Setting tab size in the ViM section.
Once connected to the ctec server, type this nano ~/.nanorc. This will open your nano settings file (or create it, if it doesn't exist), now just add the line set tabsize 4
Even better, if you want the convenience of using tabs, but want your files to be formatted with spaces (ie: if you want it to look the same on any screen/editor), then also add this line to your .nanorc file set tabstospaces. Yes I'm serious. Now when you press tab, it will act the same, but instead of placing the tab character in the file, it will places spaces (however many you set in your .nanorc file).
Shortcuts (and how to use them)
I'm sure some of you are wondering what these are:
These are command/shortcut keys. Any character prefixed with a caret (^) means you hold control. (^X means ctrl + x) And any character prefixed with M- means you hold alt. (M-U means alt + u)
While the controls at the bottom of nano my vary (ctec server has an older version than I do), they still work the same way. And if you want to see what other shortcuts/commands there are, pressing ^G will show you a list of them.
The most common ones I use, are ^X to exit (it will ask if you want to save if the file has been modified) ^O to save the file (write it) and ^W which is like ^F on most modern applications (search tool)
Opening Multiple Files At Once
So, by complete accident, I discovered you could open multiple files at once in nano, and this is going to make my life so much easier, and hopefully yours to. All you have to do is type (for example) nano file1 file2, and now nano will open file1. However, it also has file2 opened, and all you have to do to switch between the files you have open (I'm pretty sure you can have more than 2), is hold alt, and then press , or . (to go to the previous or next file respectively), although newer versions of nano simply use left and right arrow keys, unfortunately on the Clark server we don't have this luxury however.
It really is that simple. I know I'm going to get use out of this, and I hope others will too.
Compiling with GCC
I don't actually have any experience using GCC myself, so most of the information here will just be stuff discused in class. Though I may occasionally go out on my own, learn bits that interest me, and add them here.
Whenever you want to see what you can do with gcc, just type gcc --help
The quickest way to get a program compiled and running with GCC, is to compile with gcc <filename>. Your program is now (hopefully) compiled to a binary (executable) file, called a.out. To run the program, type ./a.out
Change output filename
Presumably, after a while you will want to compile your code to something other than a.out. And while you could always just rename the file, you can actually specify the output file when you compile your code.
Basic syntax: gcc <source_code> -o <output_file> the -o argument(/flag) stands for output.
Example:
ls -l
out drwxr-xr-x 5 m.rease students 4096 Jan 10 09:09 ./
out drwxr-xr-x 3 m.rease students 4096 Jan  6 14:09 ../
out -rw-r--r-- 1 m.rease students  530 Jan  6 15:36 p1.c
gcc p1.c -o myprog
ls -l
out drwxr-xr-x 5 m.rease students 4096 Jan 10 09:09 ./
out drwxr-xr-x 3 m.rease students 4096 Jan  6 14:09 ../
out -rwxr-xr-x 1 m.rease students 5384 Jan 10 09:10 myprog*
out -rw-r--r-- 1 m.rease students  530 Jan  6 15:36 p1.c
(Ignore the *)
Compiler Flags
We give flags to the compiler to tell it what to do, -o is one of them, but there are many more.
While I'm not sure how many we will use this quarter, here are some I find useful (or necessary).
-std=<c_version> will compile your code with different C standards. Some of you may have noticed that when you tried to compile code with 'for' loops in it, gcc would spit out an error. It's telling you that you need to specify C version (19)99 or (20)11, because the original C standard did not have for loops. So to make your code compile, for example, you would type gcc <code> -std=c99 -o <file> will compile your code file using C standard 99 to 'file'.
Valid C versions include: c99, c11, c17 and c18 (c17 and onward aren't available on the clark server).
If you ever try to include math.h and use functions like pow or round, you'll inevitably see a message like this: undefined reference to `pow', and while it's still a mystery to me as to why we need to do this, seeing as we've already told the preprocessor to include the header file, either way you have to add the -lm flag (in the case of math.h anyway), so your compile command will look something like this: gcc <code> -lm -o <file>. My best advice when you get an error like the one before, is just search for it online, because you probably just need to add a flag.
Compiling with make
Make is not necessarily a replacement for GCC, as we get more advanced in the quarter we may have to use GCC. However, so far, I know that our current basic C code, can be compiled in this way:
I have literally nothing against GCC. I honestly forgot about it, I just went to compile my first program, and I didn't notice the GCC command in the homework PDF, so I instinctively typed make.
In my experience, make requires something called a Makefile (which usually links to GCC!), but I discovered if I typed make p1 # don't add the file extension, it compiled my program to an executable (binary) called p1, which can then be ran by typing ./p1 # like how you would type ./a.out. I don't know if this is actually any simplier than GCC (since that too, only takes one command), but I like it. Probably just muscle memory from typing make for the last few years...
Make uses files named 'makefile' to allow you to easily compile code just by typing make, and as much as I want to show you all how to create a makefile, they seem rather advanced. I'll provide a template, however I won't explain it very much. If you still wish to learn more feel free to research it online, but they are really just a simple way to use gcc (in our case anyway). In fact in my example below, when you type something like make p1 you may notice the terminal outputs this text: gcc p1.c -o p1. That's because make has a default, universal "makefile", and it knows to use gcc to compile your code, and is set to output it with the same filename (minus the extension).
You can replace the flags with whatever you need for your project, as well as the outfile and the source file. Then you only have to type make to compile your code after making changes.
Change output filename
If you ever want to compile with make, to a filename other than that of your source code, you could rename the file, but here's how to do it when you compile.
Basic syntax: make <source_code_without_extension> -o <output_file> the -o argument(/flag) stands for output.
Example:
ls -l
out drwxr-xr-x 5 m.rease students 4096 Jan 10 09:09 ./
out drwxr-xr-x 3 m.rease students 4096 Jan  6 14:09 ../
out -rw-r--r-- 1 m.rease students  530 Jan  6 15:36 p1.c
make p1 -o myprog
out cc     p1.c   -o p1
ls -l
out drwxr-xr-x 5 m.rease students 4096 Jan 10 09:09 ./
out drwxr-xr-x 3 m.rease students 4096 Jan  6 14:09 ../
out -rwxr-xr-x 1 m.rease students 5384 Jan 10 09:10 myprog*
out -rw-r--r-- 1 m.rease students  530 Jan  6 15:36 p1.c
(Ignore the *)
Sharing Files
Turns out there's a really easy way to share files on the ctec server. From what I can tell, these directories are intended for an HTML/Web design class, but each user has one.
Navigate (using cd) to ~/public_html , this folder has permission mode 755, which means: the user who owns the folder can do anything (read + write + execute programs), and anyone else can read and execute. So, if you plays files in this folder, any user can read them, and execute them (if they are programs).
You could change this if you want, but I recommend against it, if you want people to be able to edit files, I would recommending setting that on a per-file basis.
But yeah, put files here, and it's a convenient way to share things!
(You can safely ignore the remaining content in this section)
As a "quick" sidenote, if you're wondering how these mode things work, basically they set file permissions. The mode is represented by an octal number (base 8), meaning the digits will a number between 0 and 7.
And we can change the mode of a file with the command chmod meaning change mode.
Each digit of the file's mode represents a type of user. the leftmost digit represents the user the owns the file, the middle digit represents the group that the user belongs to, and the rightmost digit represents all users as a whole. Let's look at some examples:
Mode 640 - This means the owner can read and write (modify) this file, any user in their group can read the file, and any other user cannot see or interact with the file in any way.
Mode 300 - This means the owner can modify and execute the file, but not read it (in this case they couldn't 'ls' list the file and see info about it, but can still run it), and any other user can't see it period.
Now, how do we know what each number means? There is a value assigned to each property. Read permission = 4, Write permission = 2, and Execute permission = 1, so we can combine these together to get what we want. To read write and execute we use 7, to read and execute we use 5, etc.
There is a slightly easier way to change a file's mode. Towards the bottom of the page you may have seen chmod u+x, this will add the x (execute) permission to user. So for example, if the file's mode is 644, now it will be 744. To use chmod in this way, instead of using 3 columns for user, group, and others, you will use u, g, or o respectively (or a for all 3). If you want all users to be able to execute, then you can use a+x. If you want no one but you to be able to read a file you can use go-r (group, others, take away read permission). + adds, and - removes a permission. You can any combination of ugo at once, as well as any combination of rwx at once.
Welcome to the world of Linux!
Connecting to the 'ctec' server
It was breifly mentioned in class, but not properly discussed so some people probably just ignored it.
If you're on Windows 10, please don't use putty, it's honestly silly to download this piece of software just to connect to the ctec server.
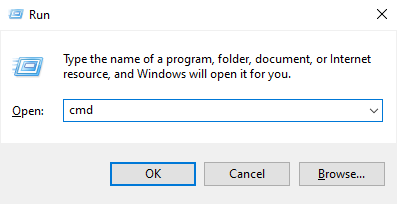
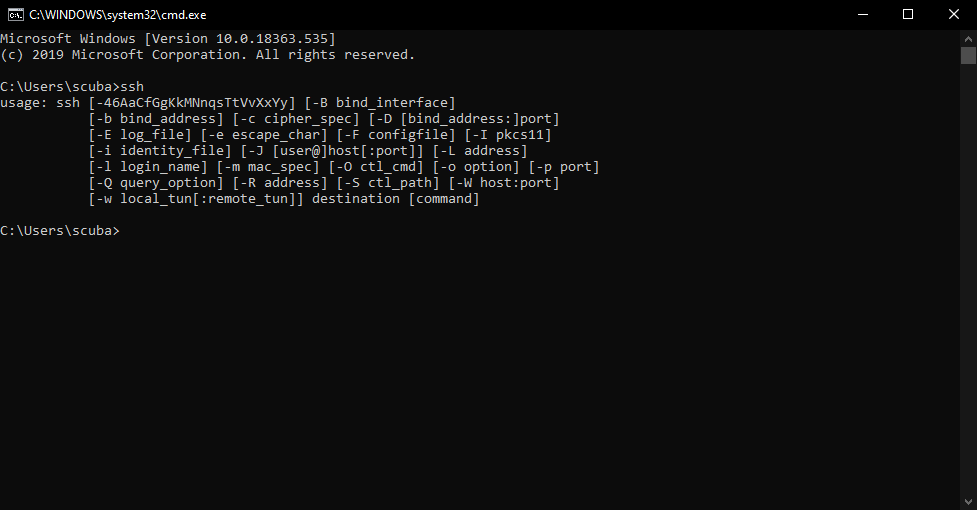
Assuming you have an up to date (at least all updates up to 2019 or so) installation of Windows 10, this will 100% work. Open command prompt (either by searching for it from the start menu, or to quickly open it press win + r, and type cmd, then hit enter), and then type ssh <your username>@ctec.clark.edu
(Showing that ssh is installed on Windows 10)
So yeah, no reason to download putty, winscp, or any others, unless you have a really old copy of Windows 10. (In which case, why haven't you updated??)
Getting files on and off the server
If you ever want to send files from your computer to the server, or get files from the server on to your machine, there's a really easy command that uses ssh to copy files.
The command is scp, and it stands for secure copy. It sends files over ssh for security, and it's just convenient in general.
I wrote some (extremely) simple scripts to automate this for you, if you want to do it yourself then keep reading below, however to get these scripts on Linux or OS X, run this:
Now just replace username with your username in each script, and if you're on Windows replace $1 with %1 and $2 with %2. To use the scripts, just run ./send.sh <file> <destination_folder> or ./receive.sh <path_to_remote_file>.
To send a file from your computer to the server, you can do it like this:
scp <path_to_your_local_file> <username>@ctec.clark.edu:~
out Debian GNU/Linux 8
out (your file)                        100%  (file size)  (average transfer speed)  (total time elapsed)
This will send your file into your home directory, if you want to put it somewhere else, just type the directory you want it in following ctec.clark.edu: (don't forget the colon!)
To pull a file from the server onto your computer, you just do the reverse:
In this case, I'm telling scp to copy the file to directory . which means it will put it in whatever directory I run the command from. So, if you open command prompt (Windows) and immediately run this command, it will place the file in C:\Users\<windows_username> because this is the directory you start in when opening command prompt. When doing this from a mac/linux terminal, the directory the terminal starts in by default is your home directory ~ so that's where the file will be placed.
If you're copying a file to a mac/linux machine, and you want to specify the directory, then you'll have to use the same structure that those operating systems use (ie: /home/user/Documents/file), and if copying to a Windows machine, you'll have to follow the Windows directory structure (ie: C:\Users\user\Documents\file). REMEMBER: Linux based systems are case sensitive, User is not the same as user!
Browsing the web on a terminal
Wait, how is that possible? It's only text, there's no GUI through a terminal!
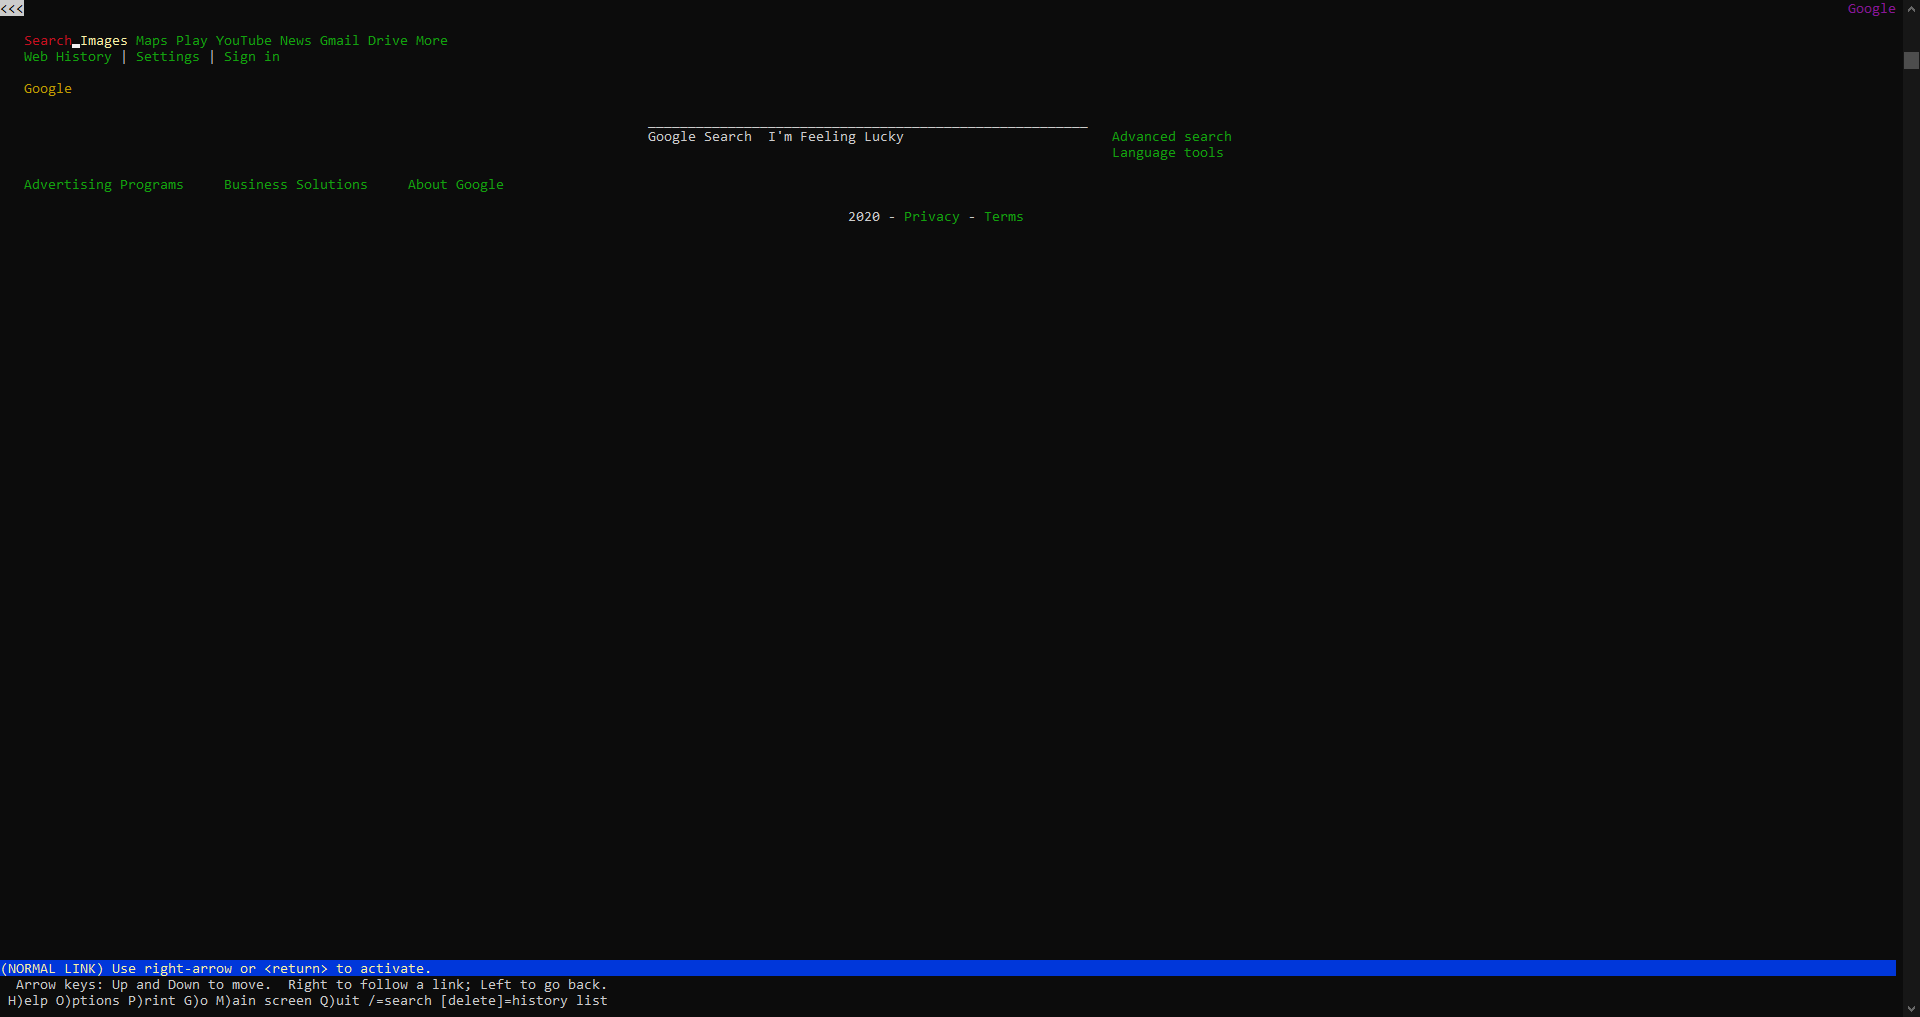
While this statement isn't entirely true, that's besides the point. This is 100% possible, with a nifty little program called Lynx. And lucky us, it's installed on the ctec server!
Just connect like usual user@local-machine:~$ ssh j.kirk@ctec.clark.edu, now run lynx
And viola, modern html5 compatible, text-based web browser at your fingertips:
As seen above, your starting page will most likely be the clark website. Remember, you aren't connecting to the internet through your home, you're connecting to the ctec server, then connecting to the internet from their point of view.
Now press G, and enter the webpage of your choosing:
Tada! Fully functional Google search, no graphics required. (You can use arrow up/down to navigate through the links on the page, as well as get your cursor on the search field)
This isn't necessarily useful for... well, anything we're going to do in this class, but it's just something I thought some people may find interesting. That's why this is in the other section.
Bonus: when you have a download link highlighted, press d to download (then select save to disk). Plus, here's this site being displayed in Lynx! (I think it looks rather good all things considered...)
Fix missing color in terminal
One odd thing I noticed while using ssh on the ctec server, was that my shell prompt was missing color:
I could still see color with my directory listing, but my shell didn't look right.
While this is most likely due to an older configuration (who knows how long ago they made this server, as of making this webpage it's been running 10 weeks straight), that doesn't really matter.
What does matter, is that I figured out a stupidly simple way to add the color back in.
Forewarning: I won't pretend to understand the .bashrc file, but what I can do, is see the difference between two files.
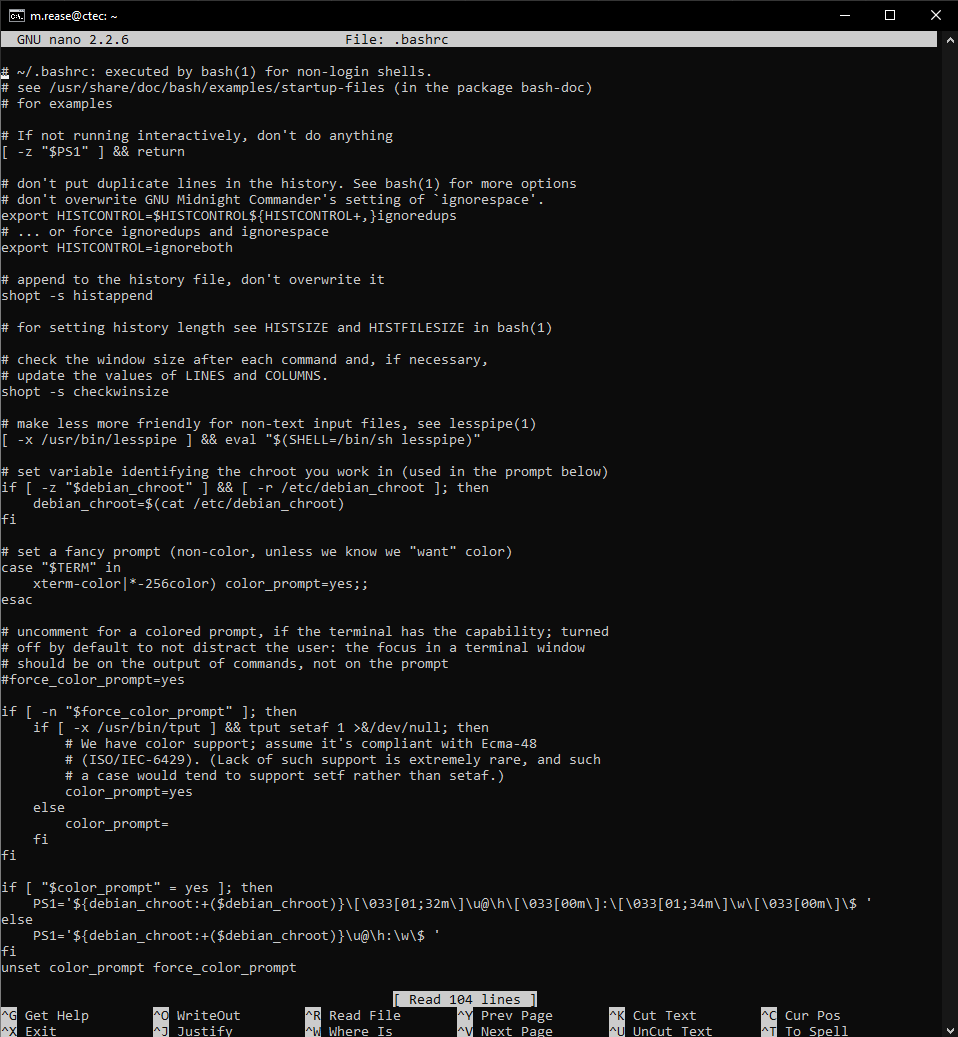
Your .bashrc file, is a shell script that is run at every login, and looks something like this:
(SSH through Windows 10 built-in command prompt)
While scanning this .bashrc, and the .bashrc on my own personal ssh server, I noticed this line:
Open your .bashrc in nano (or ViM), and yours should say (on line 33)
xterm-color) color_prompt=yes;;
All you need to do to add color, is add a second option to this case, so modify the line to look like this (feel free to backup your original .bashrc if you're feeling precautious)
xterm-color|*-256color) color_prompt=yes;;
To do this automatically, run this command on the Clark server:
The best explanation I can give, is that the shell checks to see if the user is running this in xterm, which is a terminal that's been around for a while. In my modern Ubuntu installation, my .bashrc apparently also checks for *-256color, which may be a newer standard. As I said before, I don't fully understand what's going on here, but what I do know, is that adding this second case to the switch, will fix the problem.
Now our shell looks like this:
(Note: you will have to logout, then log back in for the change to take effect)
Where is everybody?
Want to see if anyone else is connected? Or check the last time someone logged in? Well that's extremely convenient, because that is literally all you're going to find out in this section.
While connected to the ctec server, run w. This will display a list of connected users, where they are connecting from (IP), when they logged in, what program they are currently running, and some other info.
You can also run who to get a similar list, with less info, however it will display full names. w only shows up to the first 8 characters of a user's name, but who will show the whole name.
To see the last login time of a user, is rather intuitive. Run the command lastlog. This will display a list of every user, along with the last time they logged in (most of them will show **Never logged in**).
I don't know about you, but I don't enjoy scrolling through huge lists looking for one piece of information, so let's check a specific user. I don't want to turn any students into "that person that we use to learn how Linux works", so I'll use myself as the example in the command.
Try running this: lastlog | grep "m.rease" this will show you the last time I loggged in.
What is this command doing? Well the first command, as you saw before gets a list of users and their last login date. This text, instead of being output to the screen, is "piped" using the pipe character (|) to another command known as grep. While I won't go into large detail on what grep can do here, what is happening here, is that grep checks each and every line that lastlog output, and checks if that line contains the string m.rease (if you don't know what a string is, you'll learn about this quarter most likely), and if the line does contain that string, it outputs it to the terminal for you. If there were multiple lines that match, it will output all of them (although you can tell grep to only output the first match it finds).
Now, as to why you might use either of these commands? I honestly don't know. Technically there is a way for us to message each other (granted we're both connected), and even a way to message all users, however I don't want to be responsible for anyone abusing their power and spamming the system. If you want to learn, you can always find out how to do something on the internet, but for the good of myself, and everyone on the system, I'll refrain from posting that information on this webpage.
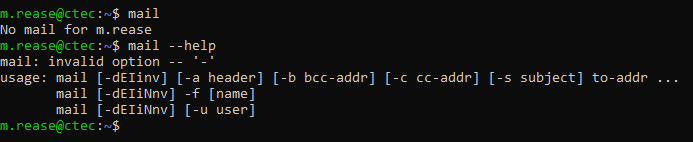
E-Mail
So, everytime I connected to the ctec server I noticed some message about email not connecting to the outside world, and that got me curious. Then I discovered that there's an intramail system on the server.
This probably looks a little confusing to some, and even if it doesn't keep reading:
To send a message just type mail <username>
Then type the subject, and then the message. When you're done typing the message, press ctrl + d , then it will prompt you for carbon copy addresses (if you don't know what this is, just press enter).
And now you have sent mail to that user.
To check your own mail (when you login it will tell if you have any), just type mail. It will show you any messages you have. Press enter to read through them.
"So how do I delete them?" admittedly I'm still working out how to delete a single message, but if you go to your inbox and type d * it will delete all messages in your inbox. So the easiest thing to do, would be to read all your mail, then you can delete it all safely.
Why are your screenshots so huge?
Easy! You're not limited to the default terminal size, just maximize your window, and you'll get a full terminal (great for programming especially).
Windows 10
(On Windows 10, press Win + R to open the "Run Dialog", type cmd, and press enter to open command prompt.)
Ubuntu
(On most Linux distros, including Ubuntu, open the terminal with Ctrl + Alt + T)
Linux Mint
(On most Linux distros, including Mint, open the terminal with Ctrl + Alt + T)
Mac OS X
(On OS X, press ⌘ + T to open the terminal)
Programming vs Scripting
What is the difference between a programming language, and a scripting language? First I'll give a table of examples.
Programming
Scripting
C/C++
JavaScript
Java
MatLab
Pascal
Python
C#
PHP
Assembly
Perl
R
Ruby
Swift
Bash
Okay cool, but what's the difference? Essentially, by programming language, I mean a compiled language. Code in these languages is compiled into machine code, and executed. While this is always faster than scripting, there is a limitation. Code compiled into a program is just that, a program. In this modern day, so many things are done on the web, and you don't run programs on the web.
A scripted language on the other hand, always remains in it's typed 'code' form, and is just interpretted by whatever software it's inside of. The easiest example is JavaScript. Go to just about any webpage, inspect element, and then (after a little digging) you can literally find the JavaScript that is running on that page, in plain-text, the exact way it was typed.
Custom commands
Much like 'll' is just an alias for 'ls -l', you can create your own aliases.
If you want to see what aliases already exist, just run alias, then just follow the syntax shown to create your own. If you still aren't sure, just check below.
alias
out alias egrep='egrep --color=auto'
out alias fgrep='fgrep --color=auto'
out alias grep='grep --color=auto'
out alias l='ls -CF'
out alias la='ls -A'
out alias ll='ls -alF' # guess there's a bit more to ll than we thought
out alias ls='ls --color=auto'
alias cd..='cd ..' # If you're used to Windows/DOS you probably type cd.. a lot :)
alias cls='clear' # Another Windows/DOS inspired alias
So yeah, most of my aliases are based on things that I do from muscle memory, but don't normally work in Linux, but here's my solution.
However, these are only temporary, the second you log out, these are gone. If you want them to be permanent, you'll have to place them in a startup script. In this case, the easiest way to do this is to create .bash_aliases in your home directory, and just place the same alias commands that you would normally type out, in the file.
nano ~/.bash_aliases
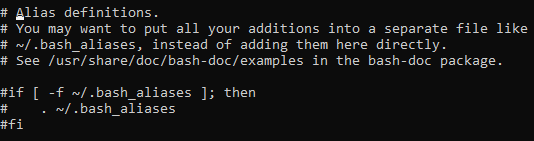
By itself, this does nothing (other than create a file), so to make this file mean something, open your .bashrc file (~/.bashrc). Press ^W, type alias, and press enter. You should see this:
And now these aliases will always be present when you login (after saving the file you'll have to re-log for the changes to take affect).
Just uncomment the 3 lines at the bottom. (A line is considered a comment, if it has a # at the beginning. Comments are ignored, so removing them allows the script to run this 3 line bit of code.)